Friday, December 11, 2015

Mural planning

For the mural layout I was thinking about last week I'm going to prime the walls and then block them out into framed sections.
Here's the hallway I have in mind. (Please excuse the clothing etc. We're in the process of setting up our "Artful Boutique" store in the gallery.


Once I've cleared the hallway and primed the wall I'll paint on the frames on and then when the whole group gets together we can each play in side the frames.

Kind of like the frames on these Mucha pieces:


Here's my doodle on the thought:

This is going to take some time to put together, so I'll start chipping away at it.

Step one. Go buy Kilz paint.

Last winter we had a little water damage becaus eof melting ice dams on the roof, so Kilz will be needed to really prep the wall.

The first "Art and Chill night" (does that work as a name?) will be on December 30th and that will probably be more of a "bring what you're working on and let's be artsy in a group" thing.

Either way. Progress!

Friday, December 4, 2015

Deck the Halls with Booze and Painting

The world is a great big ball o' stress right now.

Holidays, money, no sunlight and cold weather encroaching (for those of us north of the equator that is), and I'm seriously feeling it.

I know my friends and family are too so I've been planning on starting up an informal art night at the MAC650 Gallery in Middletown.  (Still trying to come up with a catchy name, let me know if you think of one.)

And to reeeaally kick it off?

I want to host:

Deck the Halls with Booze and Painting

Hehe. :-)

BYOB/snacks and and folks can join me painting a new mural on the walls in the hallways of NEAC. In the process I can help people learn some scenic painting techniques like, how to best hold your brush so you have great control and your arms don't tire as quickly.

I could even pre-plan the mural so that the various parts of it will need different techniques to be used.

I can teach things like

  • how to paint a crisp clean line without painter's tape
  • how to do paint wood grain
  • how to paint shadows and highlights that really make the image pop.
Those should all probably turn into blog posts one of these days.

So, to prep for this endeavor I need to figure out a few details.

Drink and Mural Materials:

  • Paint
  • Brushes
  • Paper Towels
  • Water
  • Cups or Buckets
  • Drop Cloth
  • Rags
  • ladder
  • step stool
  • cardboard

Things to do before the day

  • Pick a wall and prime it
  • sketch out the groundwork for the mural
  • Invite people (lol, that's an easy one for me to forget...)
So now there's the question of, what should the guiding idea for the mural be?

Normally when I attack the hallways with paint, I just kind of doodle on the wall and call it a painting, but it would be nice for this one to have at least a little planning behind it this time.

Hmm... here's my Pintrest board of inspiration:

Follow Jeanette's board Mural Thoughts on Pinterest.

 What do you think? Want to come paint with me?

Friday, November 27, 2015

5 Pro Tips for Choosing the Perfect Watercolor Paper


As black Friday deals swirl around me and all of the possibilities exist for me to buy buy buy. However, there is only one thing I want.

Paper.

I need to restock on watercolor and inking friendly paper and that stuff is expensive!

I'm not above drawing on non-traditional papers. Napkins, sketchbooks with filmsy paper, cardstock, the backs of movie posters (if you ever get the chance to draw with ink on glossy photo paper, do it. That paper soaks it up in such an interesting way.)

But sometimes, you just need decent paper to get your ideas out and have them be *clears throat* presentable. Especially if you are selling the artwork afterwards.

So here are my 5 Tips for choosing your perfect watercolor paper.

1) The Heavier the Weight, the Better the Paper

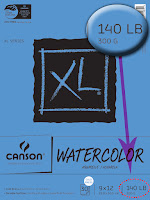
On the front of a package of paper you'll often find a number like " 60lbs." 

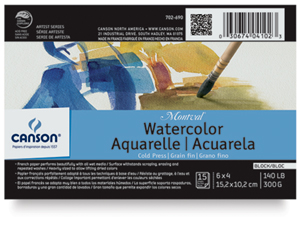
Ideally, for watercolor paper, you want to aim for 140lbs paper.

140lbs and higher can handle multiple washes without buckling.


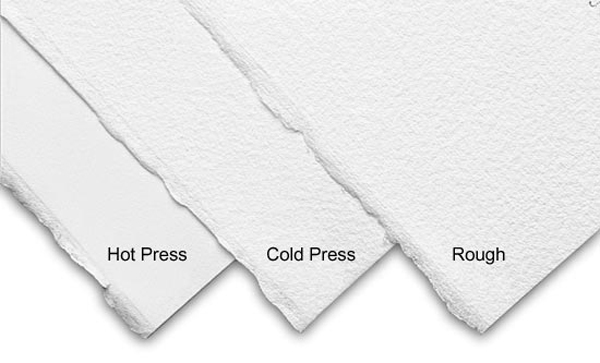
2) Cold Press vs Hot Press


Either paper option is good for painting on. The difference is, do you want a smooth surface or a textured surface to work on?

When I watercolor I prefer the extra texture of Coldpress paper.
however
When I ink I prefer the smoothness of HotPress paper.

So, do you want clean, smooth, graphic lines in your work? Or a more textured/ grunge look? Up to you.

3) Blocks vs Loose Leaf vs Sketchbook

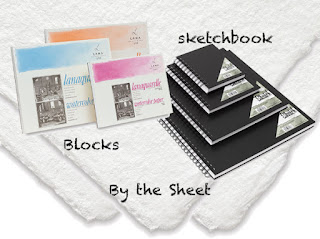
When you go out to buy water color paper  you'll notice it comes in three main varieties.

  1. Blocks
  2. Sketchbooks
  3. By the Sheet
Each one has it's own benefits, and it really depends on what you prefer, but I'll let you know the main highlights.

Blocks

What are those?
Block watercolor paper is the whole stack sealed together at the edges by wax or plastic.

Benefit
It keeps your painting stretched and ready to work on. It tends to keep really wet paintings from buckling.

This style is my favorite because it is the happy medium between the quality of "by the sheet" paper and the mobility of sketchbooks.

Downside:
You do have to work one sheet at a time for the most part. You have to slice off the top sheet to get to the next one. So if you like to bounce around from project to project, this might not be the best choice for you.

Sketchbooks


Benefit:
If you like to travel a lot while you're creating, this style will protect your work with it's covers. 

Downside:
The quality of the paper tends to not be as great as the blocks or by the sheet.

By the Sheet


Benefit
This come is far bigger sizes than either the blocks or the sketchbooks, so you have the freedom to create something large scale. 

Down side
This tends to be the priciest option


4) Trusted Brands

If you have the opportunity to get your hands on these brands you can trust them. I've used them for years and have always been happy with the quality of paper.

My top choice for quality is always  Arches Watercolor paper.

I have yet to meet a paper better suited to my (often over-saturated with paint and water) style.

However, is it pricey. So I only ever buy it when It's on sale, or I manage to find a coupon.


The brand that Isn't as pricey, but still has great paper is Canson. 

I can't be as violent with my process on their paper, but it does hold up well and I always enjoy working on it. 

5)  Where to find this goodness


There are a few stores that are my go-to for art supplies, but here are my favorites, and you can purchase online if you need to.


  1. Jerry's Art-o-Rama
  2. Dick Blick Art Supplies
  3. AC Moore
  4. Micheal's
  5. Joann Fabrics and more

-----------

Hopefully you'll find this helpful, and let me know if you have any other tips to add

XOXO
Jeanette


Friday, November 20, 2015

A Shift in Focus

Hello Blogger land.

I haven't had anything to share over here in a looooong time, which mostly has to do with my focus on my Horror Blog. That, and I've been writing my novel (finally!!) and I just haven't been doing anything in the art and design world for a good erm... two years pretty much.

Artist Burnout


Well before my last feature film project I was feeling totally burned out. Exhausted, unhappy, and unhealthy. I loved (and still love) every single person I was working with, but the work itself wasn't satisfying me anymore.

And that was incredibly hard for me to admit. It still is.

I was feeling burned out and I had also been looking at where my life was headed and wasn't entirely happy with the path I was taking. Working 8-10 months out of the year away from friends, family, and any hope of a healthy routine was not something I wanted in the long run.

But it left me with a big ol' question mark, if I'm not doing FILM or THEATER what on earth am I going to do with myself.

So I took a step back. 


Since I've taken a step back from features, I've produced my own web-series, learned how to edit, taken musical theater classes (and freakin' loved them!!), started blogging (like a boss), been doing commissioned artwork, and WRITING.

Writing has been a big deal for me because it was always that one skill I felt I was OK at, but loved doing even though it wasn't as polished as my other skills. This past year in particular I've been giving my literary side a lot more loving.

I've discovered some new things about myself

  1. I like working independently on collaborative projects.
  2. I need a LOT of variety in my weekly routine to feel satisfied
  3. I need a fair amount of face to face time with friends and family
  4. I like acting
  5. I love singing
  6. I love writing, but I'm still terrified of it. lol don't think too much on that one...
  7. and drawing is like breathing to me. I can't stop myself from doing that even if I wanted to.

Blogging

I've been learning a ton about blogging, social media and  small businesses. All of these topics I think I'll start sharing here, because I think blogging, in particular, is a very powerful tool for artists of any type to get your name out there.

In light of everything happening in the world right now I've also come to the conclusion that

Art is important


Art, is the one thing I have to offer the world that I think truly adds to it in a positive way.

I want to teach. I want to help. I want to create something that will positively impact the little chunk of tumultuous world I live in and try to help us all heal just a little from the pain we are absorbing as War inches closer and closer to us.

Because art may be one of the few things that can help us cope with what's going on. And I for one need it.

So now that I have a better grasp on what the blog is going to be talking about, beyond film-making, I'll posting one post every Friday from now on. It may be a lot of brainstorming to start, but once things get rolling you'll start to see more about the following things:


  • The art community in CT/ New England
  • Musician and Artist spotlights
  • designing classes and courses for the arts
  • personal art projects in progress, sculptures and the like
  • how to promote your work through social media
  • tools for advertising events
  • how to get work as an illustrator
  • how to step up a portfolio blog
  • how to use social media like a pro - and not annoy the heck out of everyone
among many other thoughts.

Going Forward

As I spend some more time on my thoughts here, I'll start sprucing up the site, reorganizing and bringing this site up to par with what I've been doing over on HorrorMade.com. I may even switch this over to wordpress so I can have some more control over the design etc. But that's an issue for a later time.

Thank you so much for joining me on this journey, and I hope I can bring you some valuable insights into how to approach the world of art, and perhaps together, we'll figure out how to make a proper living off of it.

~XOXO
Jeanette


Thursday, May 7, 2015

Drool worthy production design

I recently reviewed "Bathory: Countess of Blood" over on my web-channel, Haunting TV, and I enjoyed the production design of the film so much I just wanted to bring some of my thoughts over to you guys here.

First off, if you have never seen "Bathory" here's my review:


Now for the fun stuff,a slew of screen caps and my random thoughts about the film's design for you to enjoy:


The Costume design in this movie was stunning. And the cinematographer's use of lighting and framing to make shots feel like 17th century oil paintings was stunning.


Also, The props department really had their work cut out for them. I mean, just look at this painting! I wonder if they photo-shopped it and then had it printed out on canvas or if they actually hired someone to paint this. I can't imagine someone painting multiples of these though- since this painting goes through a lot in the course of the film which meant they would have needed quite a few duplicates.


And then there were the incredibly iconic wigs. The wool wigs really added a fantastical flare to the style of the characters in this film. I kept finding myself going- how on earth do you make human hair do that?! The answer is, you don't. You make animal hair to it.


Now, let's just admire this carriage and the horses tackle set for a moment. Yep. Pretty well crafted props-work, yet again.


According to the information I've been able to find, the movie was filmed in Slovakia. But you're welcome to correct me if I'm wrong. I do think, wherever they found their locations, they made incredibly good use of them. And really paid attention to hiding modern details.


Look at that chair! Look at the witch's wig! There are so many great combinations of textures and details in the movie. It made for a very rich viewing experience.


This hat. This hat was the painter's solution to painting in the darkness of the cave, and I thought that was such a cool concept. I wonder how worried that actor was about his head catching on fire during filming though...


This was one of very few sets that really felt like a constructed room, or one that was created specifically for the film. But they did such a good job with the construction of it that the only reason I think it might be constructed is because of how free the angles and camera movement were within the room. The camera's movement sort of hinted at walls being moved around... but without asking questions of people who specifically on the film, I can only guess. But I digress. What I did want to point out was how well composed this set it. You have the red of the drying clothing adding life to the edges of the frame and complimenting the blood red water of the Countess's bath, with enough visible light sources to trick the eye into thinking the lighting feels natural.

This movie was such a spectacular looking one, and I'll probably return to it again in the future when I am in need of some production design inspiration.

***************

If you're interested in seeing more image collections like this, I post a ton a research for projects and reviews over on my Pintrest board.

Thursday, April 16, 2015

How to Batch process photos in photoshop


I have wasted so many hours in my life doing redundant processes to massive groups of photos in photoshop. No longer!!! Photoshop does this thing where you can batch process entire folders of images in one go- with very little effort from it's human counterpart. I realize this isn't exactly news to the tech savy, but in case you are computer challenged [like me] I bring you the beauty that is batch processing.

Step 1: Create an Action in Photoshop. 


I found this TUTORIAL on About.com to be incredibly clear and helpful. Here's the transcript from their video: (But I do recommend following along with the video.)

"Use the Actions Window in Photoshop

The first step to using actions in Photoshop is to make sure you have the Actions window open, so go up here to Window. Then choose the Action option. Now that you have your list of Actions open we can start. In this example, I want to make an action that resizes my photo by 50 percent and desaturates it but you can make an action out of almost any process you use in Photoshop.
Record the Action for Repetitive Photoshop Edits

First, I’ll press the New Action button right here. I’ll give it a descriptive name like “Half Size / Desaturate” and press record. Now, Photoshop is watching everything that I do - THIS is how you create actions. Now, I’ll reduce the size by 50% and now I’ll desaturate. Done! As you can see, Photoshop took note of everything I did. Then press stop and I have a new action. Now, I can go to this other image - press the Play button while my action is selected and the process is repeated. Be sure to play with actions to make working with a lot of photos and processes easier!"

Step 2: Batch Process Those Bad-Boys

Follow  this TUTORIAL I found on dummies.com about how to batch process. Here are the slimmed down bullet points from their site: (For a more though break down pop on over there.)

  1. Make sure that all the files are in a single folder of their own. Because the subfolders will be included in the process.
  2. Click on File pick Automate from the drop-down menu and then select Batch.
  3. This opens the Batch dialog box.
  4. Select the set that contains the action you want to apply.
  5. In the Action pop-up menu, select the action that you want to apply.
  6. In the Source pop-up menu, select Folder.
  7. Click the Choose button, navigate to the folder that you want to use, and click OK (in Windows) or Choose (in Mac OS).
  8. In the Destination area, tell Photoshop what to do with each file after the action has been applied to it.
  9. Choose one from the drop-down menu.
  10. Specify how you want Photoshop to create the filenames for the new, processed files by selecting options from the drop-down menus.
  11. In the Errors pop-up menu, select whether you want Photoshop to stop processing a batch when it encounters an error or whether you want it to simply continue and list the errors in a file. If you select the latter option, click the Save As button and, in the Save dialog box, specify a name and location for the log.
  12. When you finish selecting options in the Batch dialog box, click OK to start the batch processing.

Step 3: Sit Back and Relax while Photoshop Takes Care of The Rest.


Thursday, April 9, 2015

How to paint slush cast latex

I have a stack of prosthetic pieces now waiting for me to bring them to life with paint but I've never actually worked with slush cast latex before... So, research time!!

*insert clicky clack noises and inspirational research music here* 

*ding!*


Pax Paint
translucent setting powder


Apparently the best way to paint slush cast latex is with pax paint. But the paint will stay tacky/sticky afterwards, so you have to make sure you set it with translucent powder after you're done. I found FX Warehouse to have the paint I'm looking for in stock, and the translucent powder you can get at pretty much any  make-up store. I'll probably hit up Ultra for mine. Oh, and "setting with powder" simply means to poof some powder on top of the paint job.


Ok great, now we know what we need, but how do we use it? That's where good old YouTube comes in. Here are the most informative videos I was able to find on the subject:


Now if I were cool I would own an airbrush machine and compressor, but I'm not. So I'll have to do this the good old fashioned way... with paint brushes.


There was a really cool tutorial that I may try, since it uses latex and acrylic paints instead of pax paint. I love cheaper options!


I hope you guys found this information as useful as I did, but if you happen to know of some more informative resources, please let me know! I'll add people's suggestions to the post.